Kristle Jones, writer and creator of Will Blog for Beauty shares her 10+ years of experience in the beauty industry with us today. You can find more of her beauty tips, tricks and tidbits at http://www.WillBlogforBeauty.com
DIY Project: Feathered Headband
Do you remember my first posting about my love of feathers? You can see it by clicking here. I can't help it - I think they are just lovely! Anyway, see the picture below? The one of the white feather and sparkles headband? I found it when I was looking for ideas for an upcoming wedding post.
Image Courtesy of THISNEXT
Isn't that headband adorable? It isn't necessarily a wedding accessory, I think it is just as cute to wear with your winter whites.
Anyway, you can buy one yourself {they run up to $134 on Etsy - I kid you not, go search for one yourself} OR you can follow this little craft and make one for under $10! Yep, you read that right...save yourself $124 and make one yourself. Here's how I made mine:
Step 1: Assemble your supplies. I used a white feather piece, white silk headband, pearls and rhinestone adhesives and hot glue - all courtesy of my local crafts supply store.
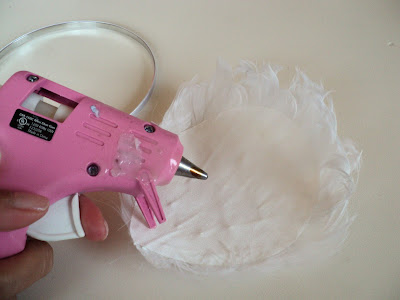
Step 2: Hot glue a long strip of glue onto the backside of your feather piece.
Step 3: Glue that onto your headband, lining up the line of glue with the headband. To create added security, I added additional glue and then backed it with a round piece of scrap fabric I had.
Step 4: Hold it in place until the glue has set.
Below, you will see a pic of what your feathered headband should look like at this point:
Step 5: Time to add some sparkle! I used these sparkle and pearl adhesive pieces that were in the scrapbooking section of my craft store. You can use these kind or single pieces or even leave your headband as is if you want something more simple. I firmly believe that a girl can never have enough glitz, so I am adding some to my headband!
Since mine came in these super long strips, I had to cut them. I had no rhyme or reason to my snips, but it all ended up working out fine. Snip wherever you think works for what you are going for:
Step 6: Hot glue your little sparkly snipits to the base of the feather piece. Continue to snip and glue until you've got your desired look.
Step 7: Ta Da! You are finished. How easy was that? It took me all of five minutes and that included two girls and a neighbor running through my house.
I think that this would be a fabulous little holiday craft that you could do while watching TV after the kids are in bed. What a cute Christmas gift for your fave friend or even for you to keep for yourself!
________________________________________
If you haven't read my plus size post, you can read it when you take a look at her blog.
So don't forget to stop by her page and check out all her blog has to offer : )
Plenty Lovee & Swaag
xoxo , Shariece
: )


Wow! That beautiful :D
ReplyDeleteNew follower :)
http://britishbirdie.blogspot.com/
Thank youu , I'm following you too : )
ReplyDeletexoxo
Lovely
ReplyDeleteWow- that looks nice!
ReplyDeleteGorgeous idea I will definitely be doing this! I am now following your blog, brilliant xo
ReplyDelete